| 1 |
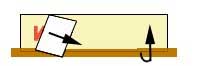
Position
the 3 layers of vinyl sign in the required location and
secure temporarily with masking tape. |

|
| 2 |
Apply masking tape
along the top edge of the sign letting it overlap on to the surface its being applied to
thus creating a hinge. |

|
| 3 |
Lift
up the sign on its hinge and peel back the opaque backing paper until
completely removed. |
|
| 4 |
Very carefully
lower the sign back down allowing it to make contact with the surface
you are applying it to. |
|
| 5 |
Using
a squeegee or credit card firmly push down the remaining 2 layers of
the sign. Start at the top center and work down and outwards applying the
letters/graphics to the surface. Make sure you apply pressure across all
sections of the sign. |

|
| 6 |
Remove the masking
tape that you applied along the top. Then starting at a top end corner
slowly and gently peel back the application tape
at approx. 180 degrees to the opposite end. Rub down any loose edges
using the backing paper removed in section 3 first popping any bubbles
with a pin. |

|